Tuesday, October 30, 2012
wildwood
When I started this painting, I printed color and grayscale copies of the reference photo (see my previous post). The color print seems to have disappeared somewhere in this studio so the painting was done without color references. I know the photo was much greener than the colors I chose but I'm happy with the painting. I wonder where that photo went? Wildwood, 14 x 14 inches on white Wallis paper.
Monday, October 29, 2012
a good idea
I'm painting over an old painting that was painted plein air at Kubota Garden. For this new painting, I'm using a reference photo taken that day of another scene.
Yesterday I received a nice email from an artist asking how I stay focused and motivated to paint everyday when sometimes it is hard to even get started. It prompted the following response from me. I thought of this good idea (doesn't everyone love their own advice?) and I like it so much, I decided to post it here.
I can see that you are taking your painting seriously - something I can relate to but also something that may hold us back. Before pastel, I worked many years exclusively in colored pencil. I gained some recognition in that medium (Colored Pencil Solution Book, etc.) and when I moved on to pastel it was very important to me to "succeed." In hindsight, I know I could have benefited from not taking myself so seriously and instead, try harder to play instead of work at my art.
I suggest you cut five 8x10 inch pieces of Wallis paper, label them Monday through Friday. Work on each day's painting for no more than an hour that day and by the end of the week, you'll have five paintings in progress. By the third week, you'll have 3 hours (or less) into each painting and you'll decide whether to continue on that painting or wash it off (yes, let go of those precious areas you are loving if you can't make the whole work) and begin again.
1. Work only Monday on Monday's painting and so on. During the week hang the paintings on the wall and ponder them…make notes but don't actually work on the painting until that painting's day comes around. OR, put the paintings away and don't look at them until their assigned day arrives. For some, pondering and making notes works best, for others, the surprise of seeing the painting with "fresh eyes" works better.
2. Paint an hour every day! This is so important to increasing skill and confidence. Look at it this way: review your paintings of 5 years ago - see how far you've come in 5 years? Did you paint EVERY day of those 5 years? How many hours did you actually paint in the 5 years? If you painted an hour a day, that would be 1,825 hours of practice. If you painted only an hour a week during the five years, it would take you 35 years to acquire the same skills and insight. Life is short, paint every day!
3. Give yourself permission to fail. This is hard for me! The best I can do at this task is a review of my paintings each year end and at that time, admit to myself that some of them are mediocre and destined for rework. Then, rework them during the coming year.
Saturday, October 27, 2012
october at the dog park
I finished my latest painting of our dog park, this one is titled "October." I guess I'm doing a dog park series without meaning to but that is where I am each day and can't resist taking reference photos while Annie plays. See several previous posts to see the in-progress stages of this painting.
Friday, October 26, 2012
dog walk in progress
The top third of this painting is 95% complete. I want the focus to be on the water and foreground so I may have to go in and reduce the detail in this top part but I won't know that until I work the water and grasses.
Wednesday, October 24, 2012
dog walk
On our dog-walk yesterday, I took this photo and printed it out in color and in grayscale. The grayscale print has a large X corner-to-corner as a guide for transferring the sketch onto my pastel surface (which also has a large X). The surface for this new painting is a 2009 painting that I spray-washed the pastel off of
in the laundry tub, then laid it face down to dry overnight.
When I unframed the old painting, there was enough Wallis paper (coated with ochre gesso) to make the new painting 1" larger all the way around. Here you can see a charcoal sketch (click on the image to enlarge it) over the top of the old painting.
For the first step, I used four pastels to block in the shapes: my darkest value, my lightest value and two other colors. See the pastel sticks lined up along the bottom.
Tuesday, October 23, 2012
Monday, October 22, 2012
Thursday, October 18, 2012
color your world
But, if you look at my October 7th post you'll see my BOS painting (yay!) and behind it, the very nice wall color of the Columbia Art Center Gallery in Hood River, OR. I contacted them, got the wall color information, matched it to my favorite paint (Behr UL1 50-15) and have spent 4 days changing the color of my world. One thought behind this, valid or not, is my observation that my paintings of recent years have been very cool in color temperature. I would like to warm it up and maybe this new wall color will help me do that.
Sunday, October 14, 2012
pondering, photographing
Saturday, October 13, 2012
painting more

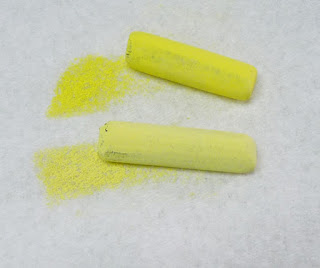
The next step for me was to lighten the lower left corner to balance all the drama in the top third of the painting. I selected two yellows. For your painting, decide what the focus is and what ever colors are used there, use them again elsewhere.
Here is s closeup of the texture.
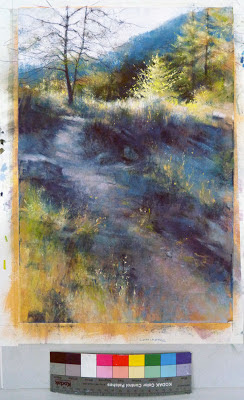
This is what my painting looks like now. The next step will be mostly detail work. I'm happy with the drama and value contrasts. I'm happy that I've used a limited palette to help simplify the scene. I hope your own painting is going well.
Friday, October 12, 2012
more paint with me
Next, I selected two values of the same blue, one just a little lighter and brighter than the other.
I applied the blues to the background hillside and in the shadowy foreground. In the foreground I applied the color very lightly to add texture and interest of the previous color showing through. Here's how the painting looks with two blues added. If you're painting along with me, select two colors of your own and apply where needed. Click to enlarge.
Love this pastel pencil color! I used it for the tree branches. Do you have some detail where you might use a pencil? Note: I applied it now because the sky behind it is complete. I also applied some bright, light, cool yellow to create the little illuminated tree. And, using the same yellow and an Xacto knife, I added some sparkle by shaving a little pastel onto the painting. Place glassine over the sprinkles and press in with your palms. Sprinkling is difficult to control so you may want to remove some of it later as I will do with this painting. Use sprinkling sparingly to enhance a statement. If you use too much, it will look like a gimmick. Click to enlarge.
Wednesday, October 10, 2012
paint with me
In my last post I talked about comparing yourself to yourself. That is, your very best work to your not-so-great paintings. I thought you might want to paint along with me by taking a painting you are not completely satisfied with and reworking it into excellence. By the way, excellence is a moving target...what was my best effort 5 years ago was the best I could do at the time. But, each day, week and year of painting improves our skills and vision which increases the confidence that is apparent in our work. Paint every day.
This is the reference photo I'm using.
Put in the lightest colors and the darkest colors. Are you painting along with me? If so, I'd love to hear about it.
Select a painting and brush the pastel off.
Select a color or two at each end of the value scale. These are the colors I've used so far: very light pink, very dark blue-violet and a very dark olive greenThis is the reference photo I'm using.
Monday, October 8, 2012
compare yourself
When I accepted the award at the NPS show this weekend, it was gratifying to have my hard work acknowledged. There is no area within that painting that I would change.
So, when I came into the studio this morning and compared myself (the award winning painting) to myself (this painting) I realized I could have done more to push it (and myself) into excellence. I unframed it and tweaked it in several places but the most noticeable is the area I've circled in red on the old painting. I'm much happier with it (the one on the left) now. CLICK HERE to see a larger image.
Review your work of this year. Pick your favorite piece and remember how you felt painting it and how satisfying it is to look at it now and know you did your very best. Now look at your other work. What would it take to push other paintings into excellence? Even though I don't teach anymore, that is a workshop I might be interested in scheduling.
Sunday, October 7, 2012
happy day
I'm very happy to post the news that "Edge of Winter" received Best of Show at the Northwest Pastel Society 2012 Members Exhibit at Columbia Art Center Gallery, Hood River, Oregon. The show runs through October 28th and was juried and judged by Dawn Emerson. This painting has a special place in my heart because the reference photo is from a dog-walk early this year with my two grandsons. A happy day then and now.
Wednesday, October 3, 2012
Tuesday, October 2, 2012
resolution
I thought the process of my resolution for this painting might be interesting to you. I took a photo of the image and printed it out. Then, with actual art in front of me, I made notes on the photo of corrections I planned to make. I had just begun to work on the sky when a friend called. As our conversation was winding down, I walked back over to the painting and began again with a blue pastel in the upper right corner. One thing led to another and as we chatted, I added the blue into several other areas of the painting. It wasn't one of the notes on my plan but once my attention was on the phone call, my intuition took over and the addition was a good idea. A good phone conversation might be one of the things to add to the list of tools for resolution of a painting.
Below is "September Side Road," 22 x 17 inches. I have posted this image on my DailyPaintworks Gallery so you can use the magic magnifier to see the details. CLICK HERE.
Below is "September Side Road," 22 x 17 inches. I have posted this image on my DailyPaintworks Gallery so you can use the magic magnifier to see the details. CLICK HERE.
Monday, October 1, 2012
detour
I'm still working on the two oil paintings I've been posting but this afternoon I took a detour to my pastel work station and managed to get "September Side Road" about 95% complete.
The top image shows blocking in shapes with pastel on Color Spectrum paper. The next image is after an alcohol wash and a some dry pastel on the upper half.
The bottom image shows dry pastel applied over all. This painting is about 95% done. I'm concerned about the shape of the clouds and the shape of the light on on road. It was not intentional but maybe the shapes are too similar? I'm thinking...
Subscribe to:
Comments (Atom)


