Showing posts with label HOW TO OIL PAINT. Show all posts

Saturday, January 23, 2021

Wednesday at the easel

I'm working on my balanced life and have set aside Wednesdays to paint. This week, I spent Wednesday in a paint-along with Netherlands artist, Roos Schuring. I have been following her work for years. Great fun and her attention to color fits my plan for color study in 2021. Here is my set-up for the paint along. 

You can see the finished painting at Instagram barbarabenedettinewton


One of my goals for the new year is a clean desktop. Sounds simple but by the end of each day I have many different pens, the letter opener, highlighter, and eraser scattered across my desktop. This week I re-purposed an iPad keyboard box into colorful desktop art. 

There are more photos and explanation on my Instagram bbnewtonartstudio page.


Saturday, October 17, 2020

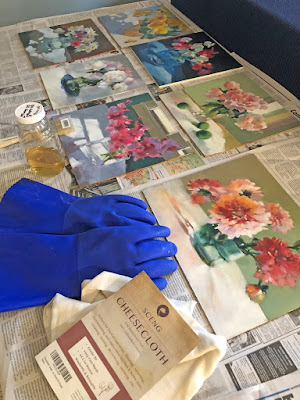
Oiling Out before Varnishing


Today is oiling out day. This procedure is done to dry paintings to even out the absorbency of the varnish. After oiling out, I can continue painting or wait a minimum of 3 days and varnish. 

How to Oil Out

  1. Apply a liberal coating of 1:1 Galkyd Painting Medium and GamsolOdorless Mineral Spirits to a dry painting. This can be applied to the entire painting or just to the area that needs to be enlivened.
  2. Allow the medium to be absorbed into the painting for approximately two minutes.
  3. Wipe off the excess painting medium with a soft, lint-free cloth.
    Continue painting. - Information from Gamblin.

Here is a  link to an Oiling Out YouTube Video by Gamblin.

Saturday, October 10, 2020

Painting and Gardening

For the past couple weeks I've been putting the flower and vegetable gardens to bed for the winter and sorting out small oil paintings for a couple Holiday Sales that begin November 1.  

When I finally returned to the easel all my paint was dry and had to be removed. Once I got that far, I took the glass off and labeled paint locations so I could easily tell the difference between the dark blues. 

Two blobs of white: I recently discover T-Z (Titanium Zinc) White which is semi-transparent and added it alongside my usual opaque Titanium White. I used the last of my Archival Yellow Ochre and added a blob of M.Graham Yellow Ochre. I was surprised at the difference. The Archival is warm, the M.Graham is cool. 

I was able to put a couple more hours into the two paintings I posted last Saturday. Here is how they look today as I set them aside again. And now, I'm off to the garden again before the rains begin.


Saturday, August 8, 2020

On the easel, off the easel

 On the easel today:

Lace Cap #2 in progress. 

I'm working on another version of the Lace Cap hydrangea - slightly different view from my first painting (see below). This time much larger at 24 x 24 inches and hopefully much looser. Suddenly my #12 brush doesn't seem  big enough. I may have to move to a 3" chip brush or some spatulas.  And, speaking of brushes...LOVING my new Princeton Aspen brushes! Thank you to Howard at Princeton Art & Brush for helping me with my purchase.

Off the easel this week:

"Lace Cap," oil, 14x 11 inches
©2020 Barbara Bendedetti Newton


"Sweetpeas with Blue," oil, 10x10 inches
©2020 Barbara Benedetti Newton


Saturday, August 1, 2020

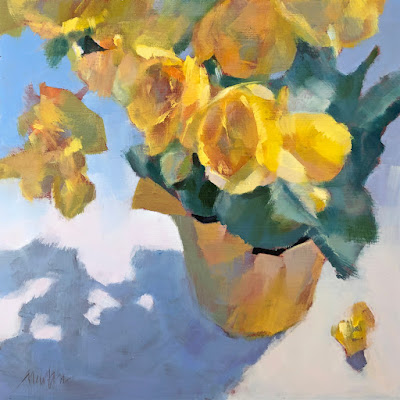
Yellow Begonia


Yellow Begonia, oil, 10x10 inches
"Yellow Begonia," oil, 10x10 ©2020 Barbara Benedetti Newton


What yellow is that? 
When in doubt, consult Richard Schmidt color charts! 
I've been using these for nearly 10 years. 


Saturday, July 25, 2020

Violets

Violets #2, oil, 10x10 inches
©2020 Barbara Benedetti Newton

Block-in of color

Darks

Lights

Last week I dug out my vintage Daniel Smith Venetian Red Gesso and prepped 10x10 hardboard panels.  I call it vintage because it is about 10 years old and I don't think it is available any longer. After prepping the 10x10 panels, I was left with a brush full of gesso and hated to waste it so I also prepped two sheets of black Fredrix canvas that I see every time I open my flat file. I can't remember why I bought black. Now I can put them back in the flat file and wonder why I gesso'd them red (it was because they were black).


Saturday, July 4, 2020

On the easel...the Hoh river

On the easel this morning, another virtual plein air with the Puget Sound Group of Northwest Artists. This time, the Hoh river. I pan, zoom in and crop the Google photos to make them my own unique view. I also change the light, value and color of the reference image.

This is the underpainting in thin oil paying attention to hue and temperature.
Underpainting detail shot.
Ahhh...nothing like a new blade in the scraper to really clean the palette.

Saturday, June 27, 2020

One on the easel, three off the easel

On the easel this morning, "Skyline Trail," from a virtual plein air paint-out with Puget Sound Group of Northwest Artists last weekend. This is the view of my easel from my newly placed contemplation-chair.
I am continually re-inventing my process. I've added my Grandma Rose Benedetti's sewing chair as a place to take breaks and contemplate the work on my easel. This chair is probably 100 years old. I remember Grandma sitting on it in her Morganville (Black Diamond) house as she embroidered and crocheted. Love this chair; it has a right-hand slide-out drawer under the seat.

Hot off the easel this week:
"Paradise, Mt. Rainier"
"Devotion"
"Oh Happy Day"
"Paradise, Mt. Rainier," oil, 10x10 inches
Purchase Information

"Devotion," oil, 10x8 inches
Purchase Information

"Oh, Happy Day," oil, 10x8 inches
Available for purchase through upcoming online show.  Contact me.


Saturday, June 20, 2020

Oh, Happy Day

Still on the easel this morning, as it has been all week, is "Oh Happy Day." This has been a two steps back, one step forward painting for me.  Started off great but one day I realized I had a tiny brush in my hand making "important" corrections. Alarm! Alarm! Step away from the painting. Get a big brush and finish it off in 5 minutes. I would have liked to have done that but I realized I hadn't fully contemplated the color temperatures and values. So, I did get a big brush but instead of trying to finish the painting, I painted out all the flowers and began again. Now I am working from the reference photo because the live set up is long-gone.

 In-progress, "Oh Happy Day," oil, 10x8 inches,
painting limes is next + corrections as shown below.
After a good foundation, I got out my new brush, Rosemary #10 Long Flat series 279 (a brush Colley suggested but in a size 12). It is a badger blend and I painted most of this painting with it. Aha! this could be the same situation as when I taught myself pastel painting. As with the imprecision of a pastel stick, I have the imprecision of a big fat brush. Works for me as I continue to strive for less detail, bigger shapes.


Suddenly I find myself halfway through this year of studying to become a better oil painter. I have a few more months of study with Colley Whisson and after that will study on my own as I did when I taught myself how to paint with pastel. I have oil-painting books but I recently added two new ones. Actually, I KNOW I have The Art Spirit somewhere but I can't find it so now maybe I have two.


Happy painting to you.

Friday, May 29, 2020

Double check and Ruby Violet Light

A couple things today:
Double checking my painting
Discovery of Ruby Violet Light


Last night when I left the studio I was thinking "Studio Garden" was almost done. I liked it. This morning I took a photo of it and with Photoshop Elements, placed it next to the reference photo. Oh, oh. Not done. I used the pencil tool with red to mark areas to fix.
1. Shape of tree left side (add sky)
2. Bring the dip of the sky above greenhouse up higher so it doesn't point so obviously to greenhouse.
3. With a rigger brush, straighten some areas on top of the fence.
4. Important area in fence (square) needs grass.
5. Extend the flowering chives up on left to lead the eye to the center of interest (Rhodie)
6. Darken and finish painting upper right
7. Darker values in brick walkway

Comparing the art to the reference is fun. Every once in a while I think about offering this service to other artists. Sort of a Critique/Mentor/Advice role. Contact me if that interests you

Vasari oil paint is wonderful! I have about a dozen tubes still in their felt-lined shipping boxes. Today while mixing color for the flowering chives, I wondered if I had a tube of anything to help me. Voila! Vasari Ruby Violet Light. Great color used alone and so useful to tone down other colors. Not too warm, not too cool. Love it!


Monday, May 25, 2020

Painting the Studio Garden, Post 1

These days, while self-isolating, I've been spending mornings in the studio and afternoons in the gardens (flower and vegetable).

I've been painting small since last November so it feels good to bust out and paint 24x24. That's the short story.

Here is the maybe more than you want to know backstory.
Exactly two years ago I was painting flowers. See the very light Percy Wiseman rhododendron out the window? I was painting that. On this 24x24 inch wood panel. It was going well - until it wasn't. At some point I made the decision to ask Jay to sand the whole thing off. I think it was something about starting with a smaller vase (you can see it in the sanded photo) then reworking that, then something about the background temperature.


Looking back at it now, I think I was hasty. But I am happy to turn the panel into this studio garden painting.
Studio Garden, day 1 The Block-In

Studio Garden, day 2 Double Check Composition

Studio Garden, day 3 Working the Middle Ground


Thursday, May 14, 2020

Paint Along May 2020 - Oil, start to finish.

If you follow this blog, you have seen previous posts about this Paint-Along I began using a friend's reference photo of the blossoming tree in her back yard. 

She usually works in acrylic but wanted to learn more about oil paint so we began the painting with an acrylic foundation while waiting for her shipment of oils to arrive. If you search labels for "Paint Along with Me May 2020" all posts should show up to show how we started as well as the reference photo I used.

When the oil paints she ordered arrived we moved on to painting with oil on top of the acrylic foundation. Note: I use a medium called Archival Odorless Lean with my oil paint. As I mix a color, I dip the tip of my brush in a little medium and mix it in. It makes the paint dry faster and I like the change in viscosity of the mix. 

Here are the steps of the oil painting with the completed painting at the bottom.

On the acrylic foundation, paint the sky and the grass. 
Grass is cool light in the background
and more yellow (warmer) in the foreground.
Block in the darkest red for the pink and white blossoms on the tree. 
Add the lighter pinks and white.
The dark red foundation makes the lighter colors pop.
"Cloud Tree," oil, 12x9 inches ©2020 Barbara Benedetti Newton
Reference photo courtesy of Barbara Cloud