I think the 35 thumbnails did the trick to jump-start my work for the new year. This is the oil-wash foundation for my first painting of the Hometown Marshland series. It is based upon the very first thumbnail in a previous post. I like this very much because of the spontaneity and am SO tempted to leave it as it is and call it an oil painting. But, the point of my bright idea was to take a reference photo, paint a watercolor thumbnail using the photo as a guide, and move on through the process to complete a pastel painting. My goal for the finished painting will be to keep the looseness but to add enough detail to draw the viewer into the story behind the scene.
My hometown is Auburn, Washington. I spent my first 21 years there with my family, in a little house built by my father near the railroad tracks. When I was shooting the photos for this series, I could hear train whistles in the distance...music to my ears and soul.
Monday, January 31, 2011
Friday, January 28, 2011
35 thumbnails
Here is the result of my bright idea of painting 35 small watercolor thumbnails while viewing reference photos on my computer display. The paper is a 14 x 20 inch pad of Lanaquarelle, 140 lb. cold press. To begin, I used a fat black Sharpie pen to layout squares - the format I prefer for my finished paintings. Click on the image to enlarge.
I started at the top left corner and closely followed what I saw in the reference photo. My left-brain said "You should write the photo number beneath the thumbnail so you can find the photo again." So, I did that for about 5 thumbnails. Then I got involved in the process of painting and decided that identifying the specific reference photo wasn't important to me.
I found myself caught up in playing with the color and experimenting with the lovely things that watercolor does - such an alive medium! By the time I got to the bottom row, my thumbnails had evolved into value and composition studies with much less detail than the thumbnails painted at the beginning of this experiment. For additional information, I used Photoshop to turn the thumbnail images into black and white. See the image below.
I plan to paint finished pastel paintings using the sheet of original thumbnails and a print-out of the gray scale images as my references. This was a fun, totally absorbing exercise.
I started at the top left corner and closely followed what I saw in the reference photo. My left-brain said "You should write the photo number beneath the thumbnail so you can find the photo again." So, I did that for about 5 thumbnails. Then I got involved in the process of painting and decided that identifying the specific reference photo wasn't important to me.
I found myself caught up in playing with the color and experimenting with the lovely things that watercolor does - such an alive medium! By the time I got to the bottom row, my thumbnails had evolved into value and composition studies with much less detail than the thumbnails painted at the beginning of this experiment. For additional information, I used Photoshop to turn the thumbnail images into black and white. See the image below.
I plan to paint finished pastel paintings using the sheet of original thumbnails and a print-out of the gray scale images as my references. This was a fun, totally absorbing exercise.
Thursday, January 27, 2011
my bright idea
I'm trying to jump-start my painting year. Went on a photo shoot (see two photos on my display above), then started with black and white thumbnails but my thumbnails always end up with too much line work and too much detail. My bright idea is to bring the reference photos up on my display and do tiny loose watercolor thumbnails concentrating on value, color and form. The first two were fun. I'll let you know how this goes.
Sunday, January 23, 2011
hometown marshland
Today we drove to my hometown for a photo shoot. I didn't realize there were so many marshy areas...we even found this elevated perch built specifically to view the wetlands. Grasses and trees are moist and muted with colors blending one into the next...a beautifully subdued time of year. Today's scenes should lure me away from tax preparation and get me painting again.
Saturday, January 15, 2011
books need new homes
I'm cleaning out bookshelves and have 36 art books from my private collection that need new homes. A variety of mediums, all in very good condition. I set up a little store on Amazon under my business name, Bina Designs (since 1988). To see my books for sale, CLICK HERE.
Wednesday, January 12, 2011
a book for you?
Some of you may know of my past with colored pencil and the book I co-authored, "Colored Pencil Solution Book." Since I posted last - 10 days ago - I've been cleaning the studio and I found a box of 9 new books (8 soft cover, 1 hard cover). If anyone is interested in purchasing one of these, please email me at barbaranewton@comcast.net. I'll be happy to sign it!
Sunday, January 2, 2011
2010 in review
2011 is here and I'm excited to begin painting again after the holiday break, but I was curious what 2010 looks like in review.
I began the year with a studio clean up and posted a tour on my art journal blog. Studio Tour
2010 painting began with experimentation in mixed media and non-objective work.
It wasn't long before I found some old pastel paintings to hose off so I could use the paper for new paintings.
"Tuesday's Child" was the result of a pastel rework.
Then, I found some old oil experiments to repaint.
Suddenly, it was summer and I was back to pastel.
A trip to Carmel, California and a series of 5 x 7 abstracted landscapes followed.
I was honored to have an article, "Infinite Possibilities," about reworking pastel paintings, published in the October 2010 issue of The Pastel Journal.
In the fall of 2010, I began experimenting with mixing my own pastel grounds.
2010 ended with a series of seven pastel paintings on my hand-made surfaces.
Looking back, 2010 was a year of experimentation. While The Pastel Journal article was certainly a highlight - as were awards received, the primary achievement of the year was learning more about myself through my work and through contact with other artists and those who appreciate art. Thank you for visiting my journal and for your comments and support. Wishing you a happy new year!
I began the year with a studio clean up and posted a tour on my art journal blog. Studio Tour
2010 painting began with experimentation in mixed media and non-objective work.
It wasn't long before I found some old pastel paintings to hose off so I could use the paper for new paintings.
"Tuesday's Child" was the result of a pastel rework.
Then, I found some old oil experiments to repaint.
Suddenly, it was summer and I was back to pastel.
A trip to Carmel, California and a series of 5 x 7 abstracted landscapes followed.
I was honored to have an article, "Infinite Possibilities," about reworking pastel paintings, published in the October 2010 issue of The Pastel Journal.
In the fall of 2010, I began experimenting with mixing my own pastel grounds.
2010 ended with a series of seven pastel paintings on my hand-made surfaces.
Looking back, 2010 was a year of experimentation. While The Pastel Journal article was certainly a highlight - as were awards received, the primary achievement of the year was learning more about myself through my work and through contact with other artists and those who appreciate art. Thank you for visiting my journal and for your comments and support. Wishing you a happy new year!
Wednesday, December 22, 2010
Tuesday, December 14, 2010
december rain
It has been pouring rain in the Pacific Northwest for days. The colors of wet trees, grasses and branches slide into one another and on into the creek. The only bright spots are the lichens on branches.
Thursday, December 9, 2010
come dance with me
This painting of dancing grass (again on gessoed rag mat with no pastel mixture ground) came together in about an hour last night. Add another 3 hours of messing with it this morning then another hour of trying to get the color right in Photoshop - now I'm tired of it. Maybe the last painting for a while...Christmas is coming.
Tuesday, December 7, 2010
pastel on gesso
In my studio, another batch of 4-ply rag mag boards with gesso on both sides is awaiting the pumice-gesso ground for pastel. I wondered what would happen if I painted directly on the gessoed board (no pastel surface mixture on it). I applied a watercolor foundation on top of the gesso and pastel on top of that. This painting didn't require any wipe offs so the gesso alone had enough tooth for my needs.
Sunday, December 5, 2010
back to bare bones

The good news is my "hand-made" surface held up through three total wipe offs of this painting. I wasn't sure if this surface (my pastel mix on rag mat) could take a hosing as Wallis can so I sprayed it a couple times with Spectra Fix to get some tooth back. After a couple more hours of work on this painting, I took a stiff bristled brush and brushed the whole thing off AGAIN from top to bottom. LOVE the trees in the background, I didn't touch them again after the wipe off. A little work on the purple bush and grasses on the right as well as some distant turquoise. I think it is now as good as it is going to get.
Saturday, December 4, 2010
the point of no return?
I'm at a turning point with this painting. I was happy with the oil-wash foundation (left) but the painting went downhill from there because I was torn between the colors of the reference photo and a darker version that I had in mind. I have wiped the pastel off twice, pasteled the whole thing over in violet once, and scrubbed and scratched this "home-made" surface close to the point of no return. I may have to simply rip this one up.
Wednesday, December 1, 2010
a good photo problem
Today I used a reference photo that looked very much like this painting. And once again, I am reminded that though I am interpreting the scene and making it my own, it isn't as challenging or interesting to me as painting from either a really bad photo, a compilation of photos, or from no physical reference at all. Note: I left plein air painting out of this comparison because it is a completely different experience.
Tuesday, November 30, 2010
the ground or me?
Another painting that I am pleased with on my marble dust/gesso ground on rag mat. I'm mixing different recipes to find the ground that will make my paintings paint themselves (haha). But, I think I may have stumbled upon one variable that I hadn't figured into this experiment. I am painting on "scraps," the windows cut from rag mats, and I feel so much more playful (translates to loose for me) painting on them rather than painting on an expensive piece of my beloved Wallis. So, while I'll continue to mix recipes - I have some extra-fine pumice on order - this has led me to another question: is it the ground or is it me?
Monday, November 29, 2010
tender season
This painting was on my easel through the Thanksgiving holiday and it cheered me each time I looked at it. With Christmas less than a month away, we are in the tender season. Emotions run high, challenges and opportunities are magnified. This painting is the second test of the pastel ground recipe I'm trying to mix. This time the test is on rag mat board (instead of masonite) and it feels better because it is softer.
On another note, my long-ago instructor, William Cumming, passed away last week at age 93. I am honored to have a painting he gave me when I was his student. I found this interesting quote from him: "We are not creators -- we are created. I hold the brush, but what holds me? These are troubling thoughts for me as a practicing atheist."
Tuesday, November 23, 2010
ground test #2
Ground test #2 seems a little better - less grit. 2/3 cup acrylic gesso + 4 teaspoons marble dust + 1/3 cup water. I applied it to another 8x10 piece of masonite but I think the true test will be when I paint on the mat board.
ground test #1
It occurred to me (duh!) that I should test the ground I'm applying to the cut mats since I've never used this mixture before. I used 1 cup acrylic gesso + 5 Tablespoons marble dust + 1/4 cup water. Put it in the blender, spread it with a foam roller. I'm glad I tested it on this 8 x 10 masonite panel because it is too gritty for me. I'll adjust the recipe and mix another batch to test. Click on the image to enlarge.
Sunday, November 21, 2010
pastel ground
Today I cut all the random sized pieces of 4-ply rag mat board in my studio into squares then applied an acrylic gesso + marble dust ground to a few for future pastel paintings. When these are dry, I'll prepare another batch and will be ready to start painting in pastel again after the holidays.
On another subject, the approach of the holiday season is the time of year that commission work is most abundant if that is something you are willing to do...it has to be a creative “fit.” My November 2010 editorial for the Northwest Pastel Society website is about some of my commission experiences. You can read it by clicking HERE.
Monday, November 15, 2010
a labor of love
This painting has gone from "hope springs eternal" to "dashed hopes" then to "hope against hope." There are a couple areas that I loved enough to stick with it. Painting it was a labor of love.
Sunday, November 14, 2010
hope springs eternal
There is a "hope springs eternal" time in the process of creating a painting when it is beginning to tell your story as you envisioned it and nothing has yet gone terribly wrong. It is a good time to stop for the day and post it as a work-in-process. It is our driveway (again) and possibly the last strong sunlight of this year. The paper is white Wallis, the foundation for pastel is an oil paint wash. Click on the image to enlarge.
Saturday, November 13, 2010
meadowflowers
Today I attended the Northwest Pastel Society 24th International Open Exhibition. Steve Hill received Best of Show with a beautiful painting of hay bales. After the awards presentation, there was a member meeting and small-painting-wrapped-in brown-paper exchange. This is the little painting I took for the exchange.
Thursday, November 11, 2010
luminesce
Ahh...back to good old Wallis paper for the second painting in the Sleeping Lady series. This one has a light watercolor wash on top of gold gessoed white Wallis. The first painting in this new series is Sleeping Lady September.
The Northwest Pastel Society 24th Open International Exhibit is now online at the American Art Company website. There are many beautiful pieces in this show - I am honored to be included. Take a look.
Monday, November 8, 2010
the eleventh hour
Thursday, November 4, 2010
Friday, October 29, 2010
stuck and unstuck
If you have been following this journal for the past few days, you know that I prepared two acrylic paintings to accept pastel. I finished the first one and posted it a couple days ago. I am stuck on the second painting. I could move forward adding more color, value, lines with pastel but I might get to the point of wanting to wash it off and I'm not sure this particular ground could withstand that process.
Here's how I'm going to get unstuck. I took a photo of the work and printed it out. Now I'm going to add colored pencil to the printout to see what might work when I go back to the easel with pastel. I've used this method before and it worked well. Let me know if you try it and how it works for you.
Wednesday, October 27, 2010
born to the season
Here is my experiment of turning an acrylic painting into a pastel painting. The scene was inspired by the precious end-of-fall days we have had recently. This painting is best viewed REALLY CLOSE to see the part the texture plays. Click the image to enlarge.
enjoy the process
Enjoy the process. I did! Recap: I had an old acrylic painting on a piece of 18 x 18 inch masonite. It was very textured because when I gessoed the masonite, I added a sheet of tissue paper and scrunched it around with my fingers to make a few ridges. To prepare the surface to accept pastel for a new painting, I spread Golden Acrylic Ground for Pastels over the old painting with a palette knife, intentionally making additional texture with my strokes. When it was dry, I used PanPastel for the first layer of color(s). After that, I applied pastel sticks as usual (the end, the side, poking, dragging). I love the way the ridges and high areas grab the color and valleys don't get any unless I go back into them with more pastel.
Tuesday, October 26, 2010
PanPastel opportunity
When the Golden Acrylic Ground for Pastels was dry, I began applying pastel but quickly found that the very textured surface (intentional) really ate up the pastel stick. Aha! A good opportunity to do much of the work with PanPastel applied with a sponge.
Monday, October 25, 2010
acrylic to pastel
You may have read my October 2010 article in The Pastel Journal magazine about reworking pastel paintings. Or, if you've been following this blog (thank you!) you have seen revisions of pastel paintings. I ran out of pastel paintings to rework so I'm going to try to turn old (and very bad) acrylic paintings into pastel paintings. Today I used a palette knife to spread Acrylic Ground for Pastels over two lumpy, bumpy old acrylic paintings. I'm not concerned with getting a smooth surface, I like a lot of texture and I can see the ghost of the old painting through the gritty new surface - that's exciting.
Monday, October 18, 2010
step art
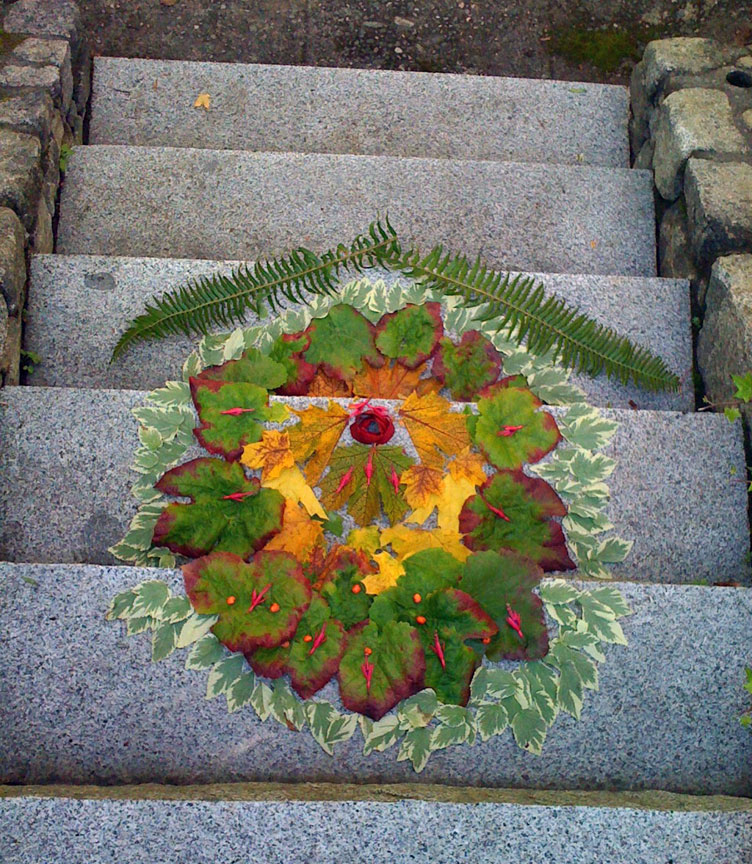
My very clever and artistic grandsons (ages 9 and 11) made this beautiful garden collage on the steps leading out of their mother's flower garden. Click to enlarge.
Monday, October 11, 2010
a roadside attraction
I have taken about a million photos of scenery we hurry past when my husband and I are on road trips. I'm always excited to view them later to select references for paintings but my photos are always disappointing. Telephone poles, bridge railings, the side mirror of the car, and sometimes I have no idea what I was thinking when I pressed the shutter button. But on our way home from Leavenworth, we came upon a road crew so we were completely stopped for several minutes. And there, right beside our car was a beautiful little scene: two trees, brilliant with sunlight and steeped in shadow - bright fall foliage and tall dry grasses at their base. Click!
I thought you might be interested to see the oil wash foundation for this little 9 x 8 inch painting.
Friday, October 8, 2010
sleeping lady
This painting is from a reference photo taken while on a late afternoon walk at Sleeping Lady Resort in the Cascade mountains, Leavenworth, Washington. I guess I'm in my "dry grass" phase now. Click on the image to enlarge.
Sunday, September 26, 2010
dust
The excess pastel dust (all colors mixed together) from my paintings falls into an aluminum-foil gutter attached to my easel. When I cleaned my easel this week, I poured the dust from the gutter onto a glass palette that is usually used for mixing oil paint, added water and mixed it well with a palette knife to the consistency of stiff peanut butter. Next, I sprayed a clean area of the glass with water and laid down a piece of plastic wrap (the water keeps the wrap from moving around). I scooped up the pastel-blob with the palette knife and plopped it onto the wrap. I picked up two opposing edges of the wrap and rolled the blob side-to-side forming a little log. I left it on the plastic wrap to dry.
A few days later, when it was thoroughly dry, I compared the muted gray/green color to the color of pastels I already had. Schmincke 093 H is darker and a Rembrandt color is lighter and has more yellow in it. I love my homemade color and plan to use it in my next painting.
Thursday, September 23, 2010
waiting frames
I thought someone might be interested to see how I store pastel paintings that are waiting to be framed.
Paintings that are complete are attached at the top edge onto archival foam core, matted (with foam core spacer painted black along the window-edge) and glass is laid over the mat. Bubble wrap corners hold the whole thing together while the painting is waiting for the frame. Additional paintings that I either haven't gotten around to sandwiching, or am not sure I'm done painting on, hang from pants-hangers along a closet rod in the corner of my studio.
I have nine paintings here waiting for frames. The last time I framed a group of paintings was May of this year so I guess I frame about twice a year except for emergencies.
An example of an emergency is having a painting accepted into a show and then finding out that, with a mat around it, it exceeds the maximum size limit (a reminder to read the prospectus carefully). I had to reframe the painting without a mat which I would like to continue doing, but I can't seem to get used to the look of my work without a mat around it.
Paintings that are complete are attached at the top edge onto archival foam core, matted (with foam core spacer painted black along the window-edge) and glass is laid over the mat. Bubble wrap corners hold the whole thing together while the painting is waiting for the frame. Additional paintings that I either haven't gotten around to sandwiching, or am not sure I'm done painting on, hang from pants-hangers along a closet rod in the corner of my studio.
I have nine paintings here waiting for frames. The last time I framed a group of paintings was May of this year so I guess I frame about twice a year except for emergencies.
An example of an emergency is having a painting accepted into a show and then finding out that, with a mat around it, it exceeds the maximum size limit (a reminder to read the prospectus carefully). I had to reframe the painting without a mat which I would like to continue doing, but I can't seem to get used to the look of my work without a mat around it.
Sunday, September 19, 2010
added color
It poured down rain all day today as I painted in my studio. Maybe that's why this scene is more colorful than the subdued hues I talked about in my last post - the one with the reference photo. Overall, I think it is improved but it isn't as loose as the plein air version and loose is good. If you want to see the workshop version, scroll down to August 3.
Saturday, September 18, 2010
starting again, again
The second day of the Handell workshop started with an overcast morning. Loaded with plein air gear, I wandered around looking for my morning painting spot. Just off the road I found dry, sleepy grasses in beautiful subdued colors. A few hours later, in full sun, the grasses became boldly upright and crisp with lots of hard edges. I liked my painting from that morning but, once again, I consider it workshop work so today I hosed it down to the ghost image to begin again.
Subscribe to:
Posts (Atom)